
Live videos are everywhere. It’s hard to resist getting in on the action, especially when so many organizations are seeing great results from sharing their events with a larger audience. But if you’re reading this article, there’s probably one thing that’s been holding you back: You don’t know anything at all about technology and assume that live streaming is beyond your reach.
Getting the hardware and software you need for your live stream setup may seem a bit daunting — especially if you aren’t technologically savvy. (If you don’t know what a Twitter handle is or have ever referenced “The Google,” you may fit into this category!) In reality, you don’t need any special qualifications to get started. Live streaming is technology-dependent, but if you can follow directions and have a resource to turn to for help (that’s us!), you can start streaming anytime you’re ready.
The Nontechnical Guide To Live Stream Setup
It’s important to keep your first live streaming setup as basic as possible. It doesn’t need to look like it could be on cable television, with four camera angles, graphics, and highlight clips. You do, however, want it to be well-executed and enjoyable to watch. Below, we’ve outlined the basic live stream setup you’ll need to begin sharing your event online — this setup will also produce a good-quality broadcast for your viewers. (If you’d like more detailed information about live streaming equipment specifically, check out this blog post.)
Camera
To get your event online, you’ll need a camera. Frankly, it doesn’t matter what kind of camera you use, because any consumer camera that has been created in the last five years should give you what you need to live stream. You can even use a GoPro or an iPhone or iPad if you want!
Remember, you’ll get the same type of feed and signal out of both a $200 camera and a $5,000 camera. Of course, the $5,000 camera will have more options, including a nicer lens and better image resolution. So before you purchase your camera, assess your specific needs. For instance, if you’ll be shooting from far away and need to zoom in quite a bit, look for a camera with high-quality zoom capabilities. If you’ll be able to get pretty close to your subject, you may be fine using a less expensive option.
Tripod
If you’re nervous for your first streaming event, shaky hands come with the territory. Even a slightly shaky picture dramatically lessens the quality of your broadcast and is unpleasant to watch.
Even a basic live stream setup needs a tripod. (There are even tripods for GoPros, iPhones, and iPads, so there’s no excuse!) We recommend getting a nice tripod that will grow with you and be able to handle bigger and better things down the line. Look for a fluid head tripod that smoothly pans (left and right) and tilts (up and down), which is particularly important for sporting events and theatrical productions that require a fair amount of camera movement.
Don’t get caught up in overspending here — you can get a good prosumer tripod in the $150 range. The fancier ones have options you may not need to start; your main concern now is getting a clean, smooth image from the camera.
Computer
To successfully live stream, there are a few things you need to be sure your computer can handle:
1. Your computer needs to have either a Thunderbolt port or a USB 3.0 port. This is where you’ll plug in your capture device (which we’ll discuss below). If you’re already panicking, don’t —there are some easy ways to tell if your computer has one of these two ports:
- USB 3.0: Depending on the manufacturer of the computer, one of two different symbols will designate the USB port — either the inside of the port itself will be blue, or the port will be labeled “SS” (which stands for “Super Speed”).

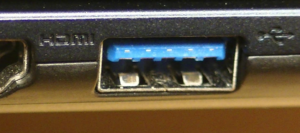
- Thunderbolt: Thunderbolt technology is most often found on Apple computers — if you have this port, it will be labeled with a lightning bolt symbol, as shown below:

Photo courtesy of solverbase.com
Note: You may see that your computer has an HDMI port — so why can’t you plug the camera directly into that? Because the HDMI port on your computer or laptop is an output, and you need an input. Since there are dedicated inputs and outputs for HDMI, a single HDMI port cannot do both.
2. You need a software encoder on your computer to be able to send the live stream anywhere. Encoders range in price from free to about $1,000. The more you pay, the more features you’ll have. But if you’re just getting started, we suggest using Flash Media Live Encoder (FMLE) from Adobe. It’s free, it’s simple to get up and running, and it will give you what you need — which is to simply convert the content on your camera into digital form ready for playback.
Capture Device
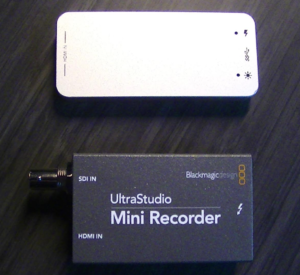
A capture device is a piece of hardware that converts video into a signal that the computer can understand. You’ll need to buy a capture device that corresponds with either your Thunderbolt or USB 3.0 port.
A good, commonly used Thunderbolt capture device is the Blackmagic Design UltraStudio Mini Recorder. For USB 3.0 ports we recommend one from Magewell’s USB Capture Family. As with everything else, the more you pay, the more features you’ll have, but keep your costs down to start. Both of these capture devices are economical and perform well.
High-Speed Internet
You’ll need access to high-speed internet from whatever location you’re filming from. You can get high-speed internet a few different ways:
- Wi-Fi.
- Ethernet (hardwired internet).
- Mi-Fi (provided through cellular carriers like Verizon and AT&T).
One element that will almost certainly affect your live streaming setup is your internet upload speed. It’s simple to test this — go to speedtest.net, click start, and see what your upload speed is. A high definition (HD) live stream requires a speed of 3-4 MBPS; standard definition (SD) requires 1-2 MBPS.
Intel Processor
The processor is essentially the energy center of your computer — it determines how much you can do and how quickly you can do it.
There are two major processor manufacturers — AMD and Intel. Intel has about 90% of the market, and it’s what you’ll need for video processing. AMD products don’t generally work with video encoding software (and they can be a pain to deal with in that regard). If you aren’t sure if your computer has an Intel processor, simply look up your computer model and Google it to find out. If it’s an older model, or if you can’t find the answer online, a local computer store should be able to tell you quickly and easily.
All Set To Stream
If you’ve gathered all the equipment listed above, you’re ready to start live streaming! The streaming setup outlined here is very basic, but it’s exactly what you need as a first-timer. As you get more comfortable with your live streaming setup, you can add on. Remember: It’s better to have an extremely simple live stream than not to have one at all. Give it a try, see how it works and how your live stream is received, then go forward from there.
If you would love to live stream your event but want a partner to guide and assist you through the process, let’s talk! At PrestoSports, we stream more than 65,000 live events of all sizes every year, with an emphasis on providing outstanding support and memorable experiences. We’re here to help!
NOTE: The streaming world advances quickly. To get the latest and most up to date information, get a demo.